Table of contents:
I designed and coded a virtual target projected on a wall in order to practice shooting at home using a laser gun.
💼 My First Coding Job
I already had a job planned for the summer 2020, but with the COVID-19 pandemic it could not take place. I was left without any way to work and gain money that summer until the day I received an email. It was sent by a friend of the teacher that was my mentor during my high school project AI in video games. He had an idea and needed someone that knew how to build it. My teacher had recommended me since they knew my coding skills from the high school project.
It was a bit like freelance work as they were not part of a corporation, they just wanted me to build a software for their personal use. It was not the first time that I made money from coding: I had won some money when I was about 13 years old and arrived second place in the Grip-It robotic competition at the Leman Make. However, it was my first coding job where I would get paid for doing something that someone requested.
It allowed me to learn how to talk to a client and understand what they wanted. I regularly made some reports containing the advancement of the project. It ultimately confirmed my will to work as a software engineer.
💡 The Idea
The project that I needed to build was to practice shooting. Shooting costs a lot of money: you need to pay for the location where you train and all the bullets that you use. It also takes a lot of time to go to the location. Therefore you do not train very often.
The solution that I needed to build was a way to train in a room of your house without using real bullets but a laser bullet instead. That way, you are not spending a lot of money on bullets, and you can train whenever you want. Indeed it only takes a few minutes (even seconds) to set up the system. So now if you have a 20 minutes break for example, you could practice aiming and shooting in your house.
In order to make this work, there is a little laser bullet that needs to be inserted into your regular gun. When you press on the trigger, it turns on the laser for an instant, and you can repeat the operation.
My work was to build a target to shoot on with the laser bullet. The target was projected on a wall with a video projector. That way, I could choose what to show and build a user interface to change what target to use or to emulate the distance by reducing the size of the projected image. I also used a camera to detect the laser impact and to place a regular bullet impact image on the projected target precisely where the shot hit. Shooting on a button displayed on the user interface would trigger it. That way, navigating through the menus and changing the settings could also be done using the laser weapon. I also made a system that allows you to see your statistics afterwards and therefore track your progress.
It was a big project, but I was very motivated by this cool idea, even thought there was a lot of difficulties that I did not know how to solve in the beginning.
⚙️ Program And Challenges
I chose to code this project in Python because it was the language that I knew the best. I ran the program on a Raspberry Pi to keep things compact and easy to set up.
I knew that there was a lot of challenging things that I had never done before, particularly video recognition. I needed to be able to detect a laser shot on the wall with a camera while displaying feedbacks and the user interface on the wall with a projector.
This is a little representation of the architecture I built:
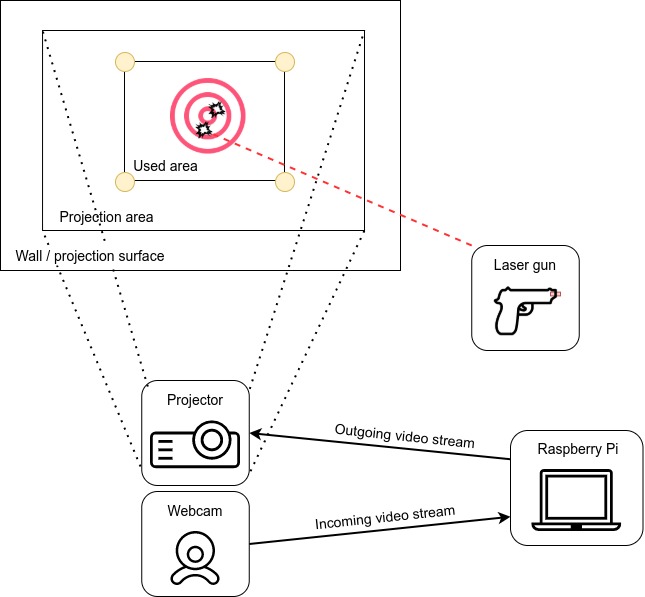
So the user interface was projected on a wall and the laser shots were recorded with a small webcam. The gun did not need to be connected to the Raspberry Pi because it was just firing a laser.
Camera Detection
The first thing that I decided to build was a way to get the input from the user: detecting a laser shot on the wall. I chose to do that first because it was the thing that I was the least confident about, so I would not waste time on the other things if I could not even build the detection.
I decided to build a proof of concept where the goal was to record a laser shot and display the impact on the wall where it landed. I also wanted to try the user interface interaction by shooting on buttons. Therefore, I had three things to build in order to test if I was really qualified to make this project:
- A plain laser detection on the wall with a simple webcam
- Camera calibration with the projector
- Basic user interface projected on the wall where I can display an impact along with a single button to clear all the displayed impacts
I made the choice to go with the OpenCV library and a simple Logitech webcam.
Laser Detection
In order to test the laser detection, I build a small box with a red button on it that would activate a laser. The box had two modes:
- While the button is pressed, the laser will remain activated (like a presentation pointer)
- On button press, a laser shot is simulated: the laser is activated for 25 milliseconds before turning off automatically
As I did not have the final laser bullet at the time, I was forced to build this small system to try it out. This is how it looked:

I successfully built the laser detection from the webcam with mode 1 (constantly showing the laser).
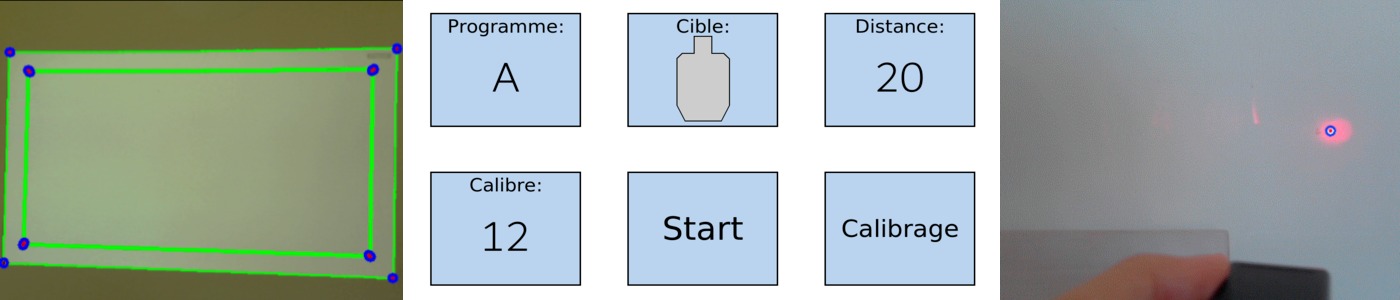
This is a small demonstration of the laser recognition:
![]()
On the left image, we can see the raw video feed from the webcam. The image processing output image is displayed in the middle. On the right image, we can see the extracted information on top of the raw image (blue circle around the laser with a red dot in the center).
Nothing really changes for mode 2 except that I just make it wait until there is a frame recorded by the camera that contains a laser dot.
I later had to adjust the laser detection a bit as the projector was emitting a lot of light.
Camera calibration
I needed to use a projector in order to report the position of the laser shot onto the wall in order to have a visual feedback after shooting. But before that, I needed to calibrate the camera with the projector. The camera needs to know where the projected surface is in order to communicate the position of the shot in relation to the surface of projection. This calibration was the first thing to do when executing the program. It is establishing a shared two axes coordinate system across the camera feed (input) and the projected area (output).
That calibration is done in two parts:
- In the first part, 4 black circles are placed (on a white background) in the 4 corners of the projected area. I coded a function that detected those circles and that calculated their center.
- In the second part, a black rectangle is displayed in a way that matches each of its corners respectively to the center of each circle from the first part.
The following GIF illustrates the circles’ detection system:
![]()
On the wall, we can see the projected area in white with the four circles displayed over it. Like the laser detection GIF, on the left there is the raw camera feed, in the middle there is the image after being processed and on the right there is the extracted data displayed on top of the camera feed. The circles’ detection was working pretty well.
The next GIF shows the rectangle detection system:
![]()
As we can see, sometimes the program detects the border of the projection surface as a valid rectangle. I solved this issue by taking the one with the smallest area if two rectangles are detected.
Once the program knows the centers and the corners, it calculates for each circle the mean of its center and its respective rectangle corner in order to have four precise points. It can use those points in order to determine the position of the projected surface in the camera feed. I decided to cumulate the circles and the rectangle detection in order to gain in precision because the laser impact needs to be placed exactly where the shot landed.
I also needed to correct the perspective effect that deforms a rectangle if we are not looking at it perfectly perpendicularly and from its center:

Once the shared axes system is established, the camera must not move at all. I later added a button in the user interface that re-calibrates the camera, just in case the impacts’ placement feels a bit inaccurate (the camera is moving a bit because of vibrations and other small factors).
The following short video taken with my phone shows the full calibration process:
It was detecting the shapes quickly, which made the whole calibration process pretty short.
Display impacts
The last part of the proof of concept was to get a visual feedback on the screen after a laser shot.
It was pretty easy to do once the camera calibration process was done, as it gave me a shared coordinate system between the camera and the projected image.
The camera detects when a laser is present and retrieves its position.
After that, the coordinates of the laser impact are converted to some new coordinates that are used to display an impact image on the screen at the same location.
On top of that, the impact image is randomly rotated, so it does not always look the same.
I added a button interaction logic that used that system: when you shoot on a button, it gets triggered.
That led to a small application combining the camera calibration, laser detection, impact placement and button triggering:
It worked really well. The proof of concept was done, so I moved on to building the final application.
User Interface
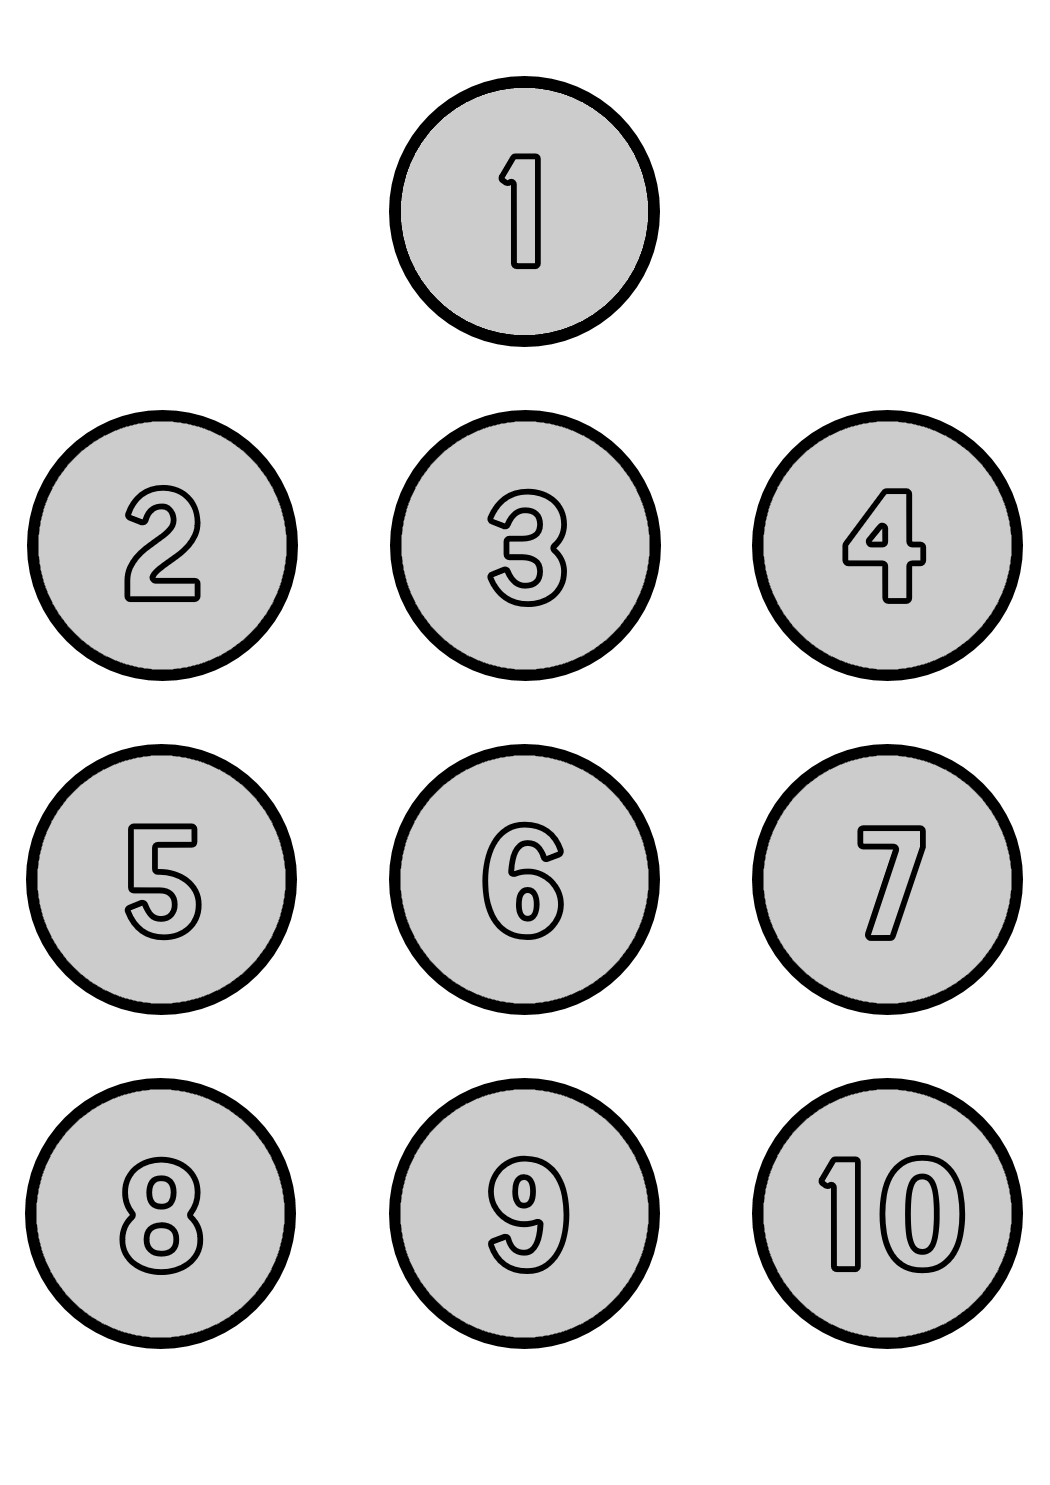
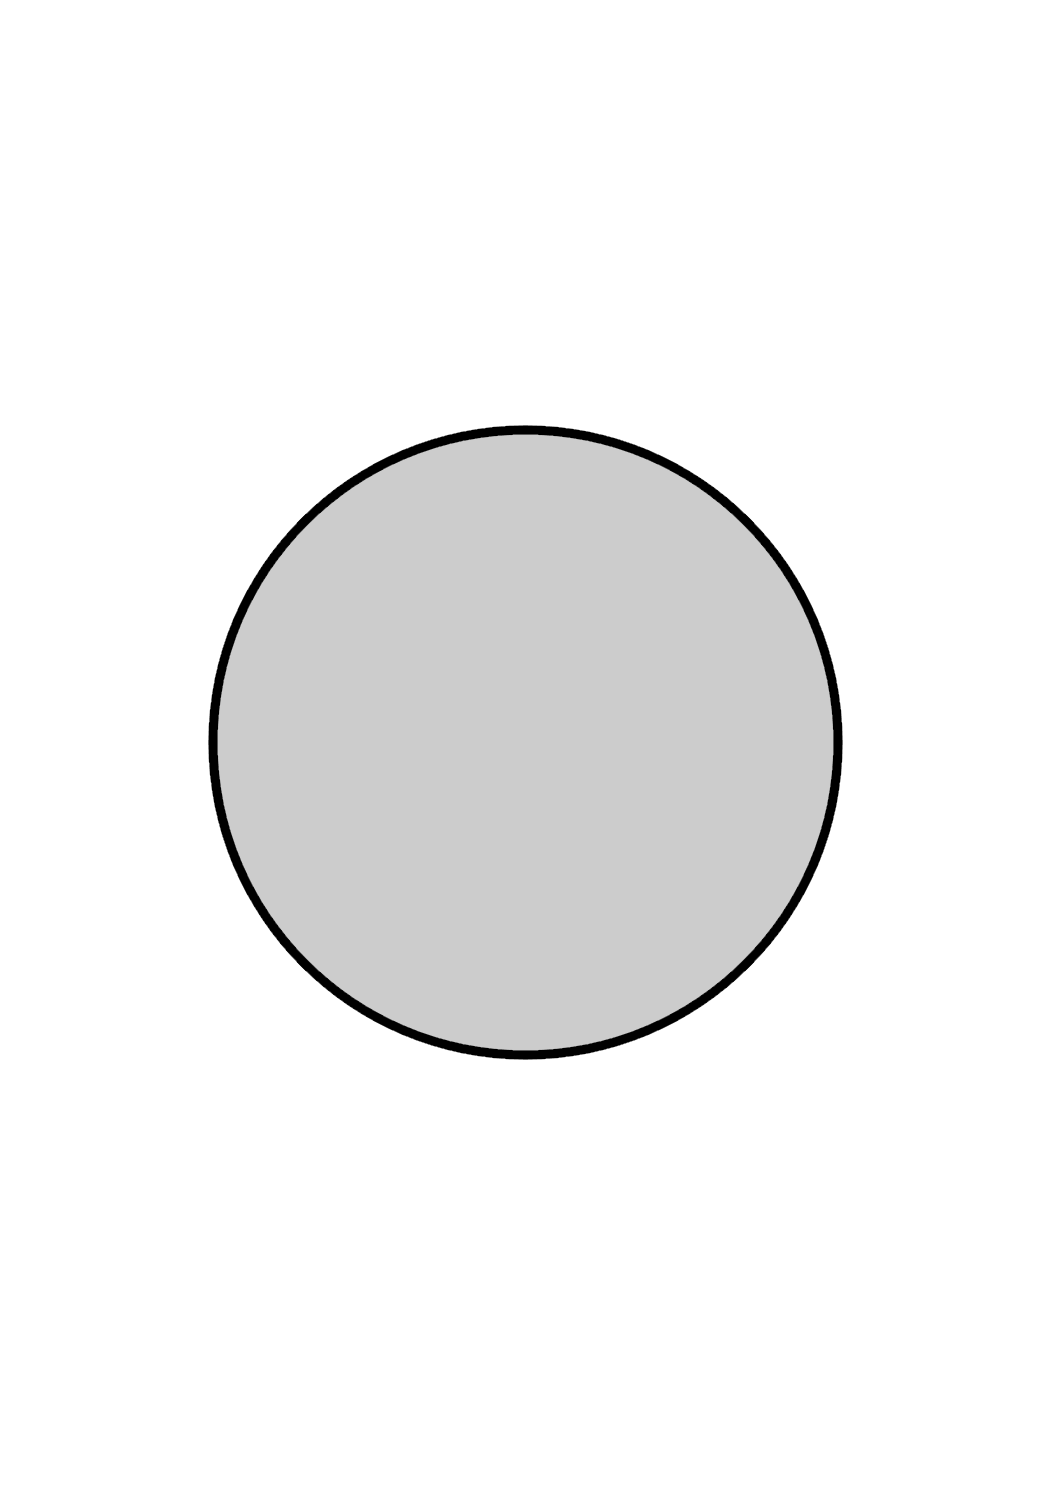
I started by designing the multiple targets that we can choose from before starting a game. Below are two examples of targets:
I used a Tkinter window in full screen mode sent as video output to the projector and built the user interface. On the main menu, I added some configuration buttons that can be used to select things like which target we want or how far from it we want to be standing. I emulated the distance to a target by simply reducing the target size according to how it would look in real life. I also added a button to re-calibrate the camera, just in case it moved a bit.
This is a small video of what the menu looked like (the user interface is in French):
The player interacts with the buttons by shooting directly on them in order to select the settings they want. When the main menu is displayed, they can see a little thumbnail on each button showing what they have pre-selected. When the player is ready, they can shoot on the start button and then on the target.
There are multiple “programs” available to the player, for examples: program A is a free-range, meaning that the player can freely shoot on the target, on program B the player has 5 bullets and 5 seconds to shoot…
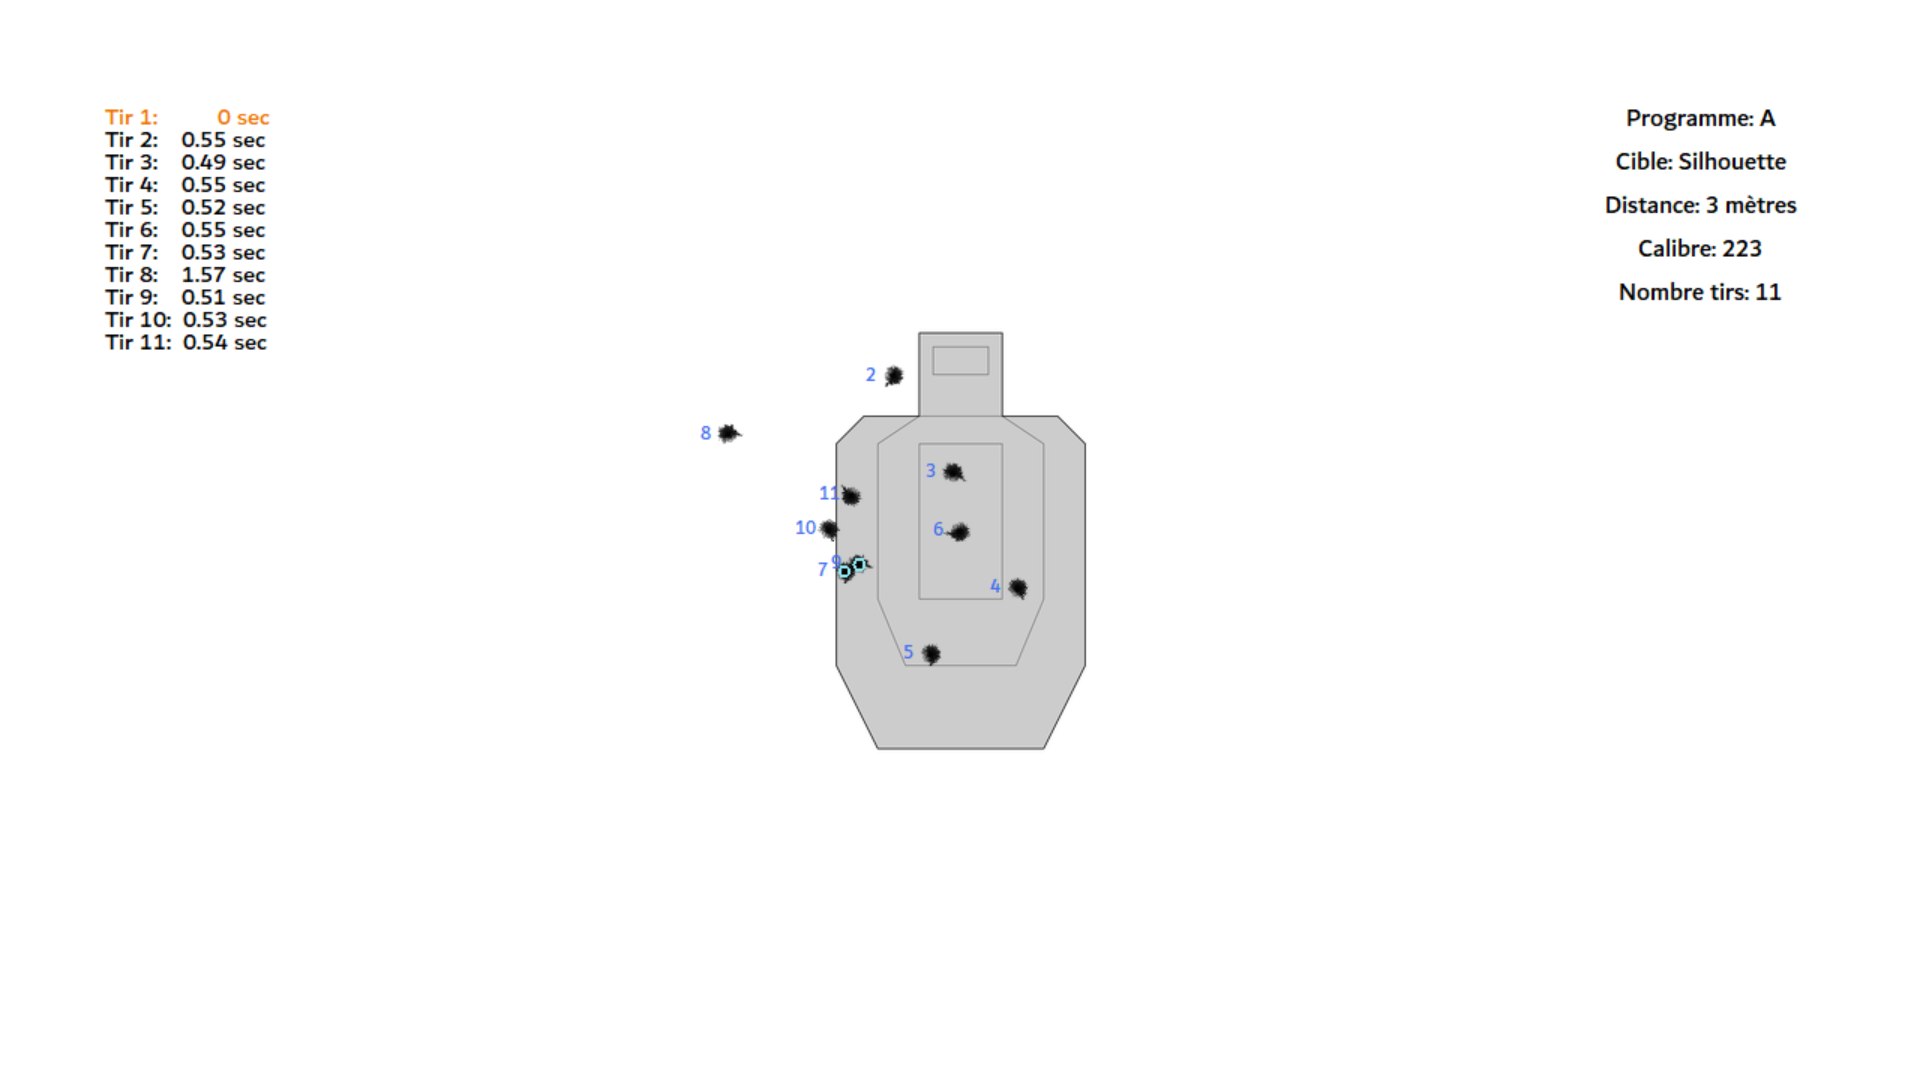
Once the game is finished, the results are displayed on the screen:
- The target is enlarged
- All the shots are represented and numbered chronologically
- In the top left corner, the time between each shot is displayed
- If the shot was so far from the target that it could not be displayed on the enlarged one in the results screen, the shot is shown in orange in the top left corner
- The settings used for the game are displayed in the top right corner
- If two shots are too close to each other, a light blue circle is drawn on each of them
This is an example of a result page:
After seeing their results, the player is taken back to the home screen.
Saving the results to access them afterwards
At the end of a game, the result page is also saved and uploaded to the cloud in order to access it later. I used the MEGA API in order to upload a screenshot of the result screen. The player can later use the MEGA application on their phone (for example) and see all their past games. That way, they can analyze their mistakes and track their progress.
Raspberry Pi Too Weak
I started to code the program on my laptop with the idea that it would run on a Raspberry Pi at the end. However, when I first installed everything on the Raspberry Pi, it was running really slowly and the interface was lagging a lot. I also got heat warnings and it even shutdown on its own multiple times (to prevent overheating). At that point, I thought that a Raspberry Pi would not be powerful enough for this project. Video processing and recognition is a very resource intensive process, and I thought that I would need a real laptop or a kind of mini PC to run the software.
I solved the overheating issue by buying an active cooling fan like this one:

Even though I have been using Raspberry Pis in many other projects where passive cooling was always sufficient, this time I needed something like that to keep the board cool. The Raspberry Pi was not shutting down anymore, but it was still running really slowly and the CPU usage was always above 90%.
As a mini PC was too expensive, I kept trying to optimize my program. I finally found a way to reduce the CPU usage: lower the video input resolution from the webcam to 660x480 pixels. That way, the video recognition process was less intensive and the program was running smoothly. It caused a little drop in the precision of the shots, but it wasn’t too bad. However, it was more noticeable as the simulated distance from the target increased because the shooting area was smaller, but the resolution stayed the same.
When I think back to this issue, I might have overestimated the Raspberry Pi. Indeed, it had to handle a lot of things: webcam input, video recognition, computing and display output to the projector.
The Real Laser Was Too Fast
Finally, there was another issue: the real laser bullet that my client bought for their gun was not firing for long enough to be detected by the webcam every time.
Sometimes, the laser was turning on and back off between two frames captured by the webcam.
The webcam was recording about 40 frames per seconds, but it was not enough to detect the impact every time.
My homemade laser “bullet” that I used for testing the detection was set to last 25 milliseconds, which was enough for the camera to detect, but the real laser that my client bought lasted less than 15 milliseconds.
However, they told me that they would either find a way to modify the bullet they bought to last longer or buy another one.
📝 Conclusion
The whole project building took me about a month of work. We met a couple of times before I came to their house to install the final product/system. I learned a lot about video recognition and programming custom user interfaces. I also learned how to talk and exchange ideas with a client about how they wanted things to be. It was not always easy as sometimes I would not have made the same choices if I was building this project for myself, but I listened to their wishes. I also did a great job at keeping a change log every time I added something to the software in order to keep track of what I was doing and give my client some updates. I enjoyed doing this project a lot and it was really fun.