Table of contents:
I designed my own smart watch home screen and customized it the way I wanted it to be.
💎 The Desire
I just bought the Xiaomi Band 4 which was the very new smart watch model from Xiaomi at the time. As I already had bought the Xiaomi Band 2 and I was really happy about it, I knew that I would not be disappointed by the new one.
Anyway, I received the watch and I liked it a lot. There is a whole community around this watch because with this model, you can customize the home screen the way you want. As many designs were very cool, I downloaded many of them and that inspired me to do create my very own watch face design. I thought that if so many people could create these designs, why couldn’t I?
🛠 The Creation
How to do it
I had never done this kind of thing before so I absolutely did not know where to start. This is why I did what everyone else would do: Google it. I did some quick research and I found this tutorial posted on the Xiaomi forum. It described well what I wanted to do and seemed pretty easy.
What you need to do in order to create a watch face is to split your design idea into very small pieces (every numbers, every logos, etc). After that, you need to save all the images you have designed in the same folder and rename it with a number (first image 0, second image 2, …).
Once you have done that, there is a program to download which will convert everything into a single .bin file. Then you can upload this .bin file to your watch and you are done.
Design
For me, this project was more about image design than about actual coding. Even if there is a bit of json, everything else is just image editing.
I wanted to use the well known Adobe PhotoShop editor but it was too expensive for the use I would make of it so I looked for an alternative. After some quick researches, I found Paint.NET: a very easy to use PhotoShop like image editor. It was fine for what I wanted to do.
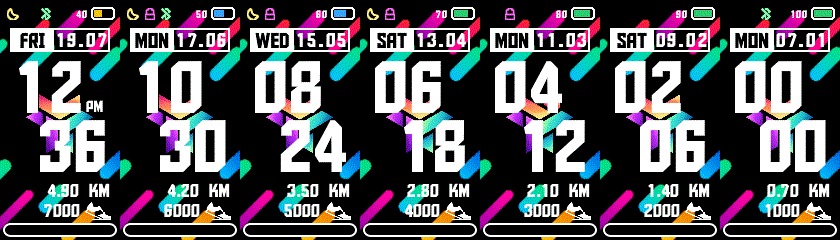
This is when I started to design my different elements. I started with the numbers (big ones and small ones) and the date. Then I drew them pixel by pixel. As the screen of the band is small, it did not take that long. Once I finished with the numbers and the date, I started to design the background. I wanted something colorful and fun so that is what I tried to achieve. After that, I designed the daily steps goal progress bar. Unfortunately we cannot see it in action in the generated images (white gauge filled with black) but as you get closer to your daily steps goal, the bar fills itself with some blue to green gradient. I finished the designing part with the small icons (lock, bluetooth, …) that I wanted as simple as possible.
Export
At this point, I was pretty satisfied by the design. I renamed every image (there were 101 images) with a number going from 0 to 100.
I was now ready for writing the json file. This is just a file that will tell the program that “compiles” the watch face where each image is and what is its purpose.
This is an example taken from the json file:
1
2
3
4
5
6
7

"Background": {
  "Image": {
    "X": 0,
    "Y": 0,
    "ImageIndex": 0
  }
}
In the example, we can see that I indicate to the program that the background image has the index (file name) 0 and that it needs to be placed on the top left corner of the screen (x=0, y=0).
I did the exact same thing for each image (image index and position). Luckily sometimes you can define the index by ranges: for example the images representing the numbers from 0 to 9 are indexes 59 to 68.
When I designed the different images, I also made some weather related ones (temperature, …) but I finally decided not to put them into the watch face because it would make things much too close to each other and I preferred to have more room between each element.
After I had finished filling the entire json file, I executed the program (AmazfitBipTools_Mi41.0.3) in charge of converting all my work into a _.bin file that could be read by my watch.
I highly encourage you to take a look into the (project’s GitHub repository) if you are interested in learning more about the files I described.
How it looks
This is a gif of the final result of my watch face:
It rotates between random hours and dates etc in order to show multiple configuration. The only problem with this gif is that the steps’ progress bar does not fill up and stays black.
🚀 Publication
Before publishing this watch face to make it available to anyone worldwide, I wanted to give it a simple name. I chose Gruvw Rainbow because it has some kind of rainbow colors and I wanted my name in it.
I decided to publish my work on the same platform/site I used in the beginning when I was downloading and testing watch faces done by other users: https://amazfitwatchfaces.com/mi-band-4/view/3018
It has (at the time I am writing this) over 810 views and over 290 downloads. I am very happy about that and it is pretty fun to think that someone could literally be looking at his watch right now and see the time on the watch face I designed.
📄 Conclusion
In the end, I am very satisfied about what I have done in this project. Even though it is not a project that took me weeks to complete (it took me about 3 days), I am still very happy to have learned a way to customize my smart watch. On top of that, it is very satisfying to look at my wrist and see the design I created.